Thursday, December 4, 2014

Hunter becomes the hunted after shooting famous albino deer

Hunter becomes the hunted after shooting famous albino deer


Jerry Kinnaman was up early, hunting in southeast Missouri, when he saw it. It had been a chilly night — the ground was crunchy — but on Tuesday morning, Kinnaman spotted the albino buck about 85 yards in the distance.
Kinnaman bagged the buck — which was called “arguably Cape Girardeau’s most notorious deer” by the Southeast Missourian. It was a legal kill, but a controversial one.
“This is a buck of a lifetime,” he told the newspaper.
“Not my biggest buck but at 7 1/2 years old he might be the oldest,” Kinnaman wrote on Facebook. “Let the bashing begin!”
And it did. Kinnaman said in an interview with The Washington Post on Thursday that it has gotten so bad, he has received death threats over the deer.
“People are all tough on the computer,” he said, “but it’s easy for them to say that because they know they’re not going to get in trouble for it.”
The deer was something of a celebrity in Cape Girardeau. Kinnaman said that some locals felt a connection to it and would notice the animal on drives through the city.
“I was the same way as anybody else about this deer, so I understand the relationship some of these people have,” he said.
Here’s the thing, though: The deer wasn’t doing well, Kinnaman said. He said there was “not an ounce of fat on him,” and Kinnaman’s taxidermist noted that the deer’s teeth were in poor condition. The animal would have died this year, Kinnaman said, whether he harvested it or not.
“They never even thought about how hard it would be for this deer to survive once he got to a certain age,” he said.
For what it’s worth, Kinnaman contacted a local conservation department office and was told that he hadn’t broken any regulations. After his taxidermist is finished, Kinnaman said he might donate the mount to a local nature center, so Cape Girardeau residents can continue to see the deer.
“There’s a lot of rumors I shot this deer for a reward,” he said. “I’m, like, ‘no.’ ”
The kill — and subsequent backlash — follows a similar incident in Michigan, in which an 11-year-old boy bagged an albino buck. Gavin Dingman was crossbow hunting with his father, Mick Dingman, when he shot the deer in October.
“I’ve had people tell me, ‘You should have taken the shot. You don’t let an 11-year-old take a shot at a deer like that,’ ” Mick Dingman told the Daily Press & Argus. “To me, in my opinion, it doesn’t matter if it’s a spike or a doe or a trophy deer. If you have confidence in them, it shouldn’t matter what they are shooting at.”

Tuesday, December 2, 2014

Missouri Bow Hunter Takes Rare Albino Buck

It's rare to see a mature buck, much less a mature albino, while in the deerstand.  Legendary bow hunter, Jerry Kinnaman, has done just that. This amazing buck is approximately 7.5 years old.  This Southeast Missouri buck is known to some as Whitey, Casper, Ghost, and The Goat.


After years of practice, preparation, and patience, Jerry's plan finally came together on a cold December morning.  As he sat quietly 24 feet in the canopy the elusive buck crept underneath.  Jerry heard a small crunch as the buck stepped through the icy leaves. Without moving a muscle he slowly gazed to his left and spotted the buck creeping between the brush. Jerry's heart pounded. He could see his breath as it hit the bitter cold air. He slowly stood up as the buck passed behind a small tree, then as the buck passed a thick bush Jerry realized it would be his last chance to raise his trusty bow before this buck disappeared into the distance.  Jerry held his bow and focused on his target.  He said to himself, "Aim small, miss small" he quickly went through his shooting checklist.  Grip-check, anchor-check, pin-check.  He slowed his breathing and gently released the string.  The arrow was true and the shot deadly.  It pierced his heart and the great animal was down within 30 yards.

Jerry lowered his head.  He had finally been given this wonderful opportunity. All of his practice and patience was worth it.  He passed the test. He overcame the challenge.  He hung is bow and crossed his frozen fingers.  He said a prayer and thanked the Lord for blessing him with this hunt.  He looked up and smiled like a little kid.  He was filled with excitement and pride.

Shooting albino deer is somewhat controversial. Most hunters look at an albino as a rare opportunity and a trophy.  Some believe they should be left alone because they are rare, yet evolution says that this is not a favorable trait.

How rare is an albino deer?
In a December 2013 report published by USA TODAY, Wisconsin naturalist John Bates, co-author of "White Deer: Ghosts of the Forest," said albino deer are born once in about 20,000 births. Some biologists claim only one in 100,000 deer is born albino, the report said.   It is even more rare they they make it to this age. Truly amazing.


Tuesday, July 22, 2014

Texas Rig Instructions

Texas Rig Instructions

The "Texas Rig" refers to a way of riging your bait. It is one of the most common rigs used while fishing with soft plastics. One of the reasons it's so popular is because it's almost completely weedless. This rig is great for fishing in and around weeds and heavy cover.

What you need

  1. Worm hook
  2. Plastic Worm
  3. Bullet Weight

How To rig it

Texas Rig Instructions

Sunday, July 13, 2014

Power Bait Trout RIgs

PowerBait Trout Dough Bait

PowerBait Trout Dough Bait comes in a variety of colors and scents. Depending on your area, one color and/or scent may be preferred over others.
As a general rule, we use two in particular - Glitter Trout Dough Bait Rainbow with Garlic Scent and Glitter Trout Dough Bait Rainbow with Extra Scent.
We have discovered the extra scent and the different colors along with the glitter tend to trigger more strikes in the ponds we fish.
That said, we also bring a container of pink PowerBait Trout Dough Bait as a back up; pink is one color missing in the Rainbow offering.
To fish the PowerBait Trout Dough Bait, the Team uses four fishing rigs which are described in the sections below.
Do check them out and let us know if they work for you this Season!


PowerBait - Trout Dough Bait

PowerBait FW Natural Garlic Scent Glitter Trout Fishing Bait (Rainbow)

List Price: $5.99
Trout Fishing Rig Components

Components for the Trout Fishing Rigs

The photo in the sidebar shows the components used for the four Trout Fishing Rigs used by the Field Team.
In addition, the following is a list of the components for your reference:
  1. Three 1/8oz Bullet Weights
  2. One 3/0 Split Shot
  3. One #6 Split Shot
  4. Three Beads
  5. Two Small Barrel Swivels (or Snap Swivels)
  6. Four Treble Hooks (size 14-20)
These are the basic components used to make the four Trout Fishing Rigs. However, the weight of the Bullet Weights and the size and/or number of Split Shot used can be modified based on the existing conditions such as wind, current flow, and casting distance.
4lbs Fishing Line
4lbs Fishing Line

Fishing Line

For ease of illustration, we are using a yellow Dacron line to make the Trout Fishing Rigs described in this article.
When fishing, we use 4-6 lbs test monofilament fishing line. More often, the brand is Stren or Trilene; whatever happens to be on sale at our local sporting goods store.
Trout Fishing Rig #1 Components
Threading the Bead
Threading the Bead
Completed Bead
Completed Bead
Trout Fishing Rig #1

Trout Fishing Rig #1

The first of the four Trout Fishing Rigs described in this article uses a Bullet Weight, a Bead, and a Hook.
To make this rig, begin by threading the fishing line through the Bullet Weight, pointed end toward your reel.
Next, thread the fishing line through the Bead from one end.
And then, double the fishing line back, and thread it through the Bead a second time.
The fishing line should pass through the same end when threaded through the Bead the first time.
When the fishing line is tightened, the Bead should look like the picture in the sidebar - "Completed Bead".
Also, allow for 12-18 inches of fishing line on the tag end. If you need to increase the tag end, loosen the line through the bead and adjust to the desired length.
Finally, using an improved clinch knot, tie the hook to the tag end. Refer to the picture in the sidebar - "Trout Fishing Rig #1" to see the completed rig.
This is a quick rig to tie and allows for adjusting the tag end (leader) by loosening the loop through the Bead.
When used with an Ultralight Fishing Rod, it casts easily and makes for long cast when needed.
It also is sensitive to light strikes as the line slips through the weight minimizing drag, which will increase hook ups with finicky Trout.
The drawback... it is limited in strength because of the loop created by the Bead. It should only be used where small Rainbow Trout are stocked (9-13 inch Trout).
If larger Rainbow Trout are in the area, better to use Trout Fishing Rig #2 or Trout Fishing Rig #3.
Trout Fishing Rig #2 Components
Trout Fishing Rig #2

Trout Fishing Rig #2

The second Trout Fishing Rig uses a Bullet Weight, Bead, a small Swivel, and a Hook.
To make this rig, begin by threading the fishing line through the Bullet Weight, pointed end toward your reel.
Next, thread the fishing line through the Bead, and then, using an improved clinch knot, tie the small Swivel to the fishing line.
Then, measure 12-18 inches of fishing line to make a leader; and then, cut and tie it to the other end of the small Swivel.
Finally, tie the tag end of the leader to the Hook. Refer to the picture in the sidebar - "Trout Fishing Rig #2" to see the completed rig.
This rig takes a little longer to tie compared to Trout Fishing Rig #1 and does not readily allow for ease of adjusting the leader's length. However, it will handle larger Rainbow Trout!
It is sensitive to light strikes as the line slips through the weight minimizing drag like in Trout Fishing Rig #1.
It's drawback is when fished in rivers with a strong current the rig may slip and result in missed hook sets. When this happens, use Trout Fishing Rig #3.
Trout Fishing Rig #3 Components
Trout Fishing Rig #3

Trout Fishing Rig #3

The third Trout Fishing Rig uses a small #6 Split Shot, a Bullet Weight, a Bead, a small Swivel, and a Hook.
To make this rig, follow the same steps as Trout Fishing Rig #2.
Then, push the Bullet Weight and Bead against the small Swivel.
Finally, attach the small #6 Split Shot about two inches from the Bullet Weight. Refer to the picture in the sidebar - "Trout Fishing Rig #3" to see the completed rig.
By adding the small #6 Split Shot, the rig will handle stronger currents and lessen the likelihood of a slack line caused by the current.
Trout Fishing Rig #4 Components
Trout Fishing Rig #4

Trout Fishing Rig #4

The fourth Trout Fishing Rig is the simplest to setup, using a 3/0 Split Shot and a Hook.
To make this rig, attach the hook to the fishing line with an improved clinch knot.
And then, measure 12-18 inches from the hook and attach the 3/0 Split Shot.
That's it... refer to the picture in the sidebar - "Trout Fishing Rig #4" to see the completed rig.
This rig is the least sensitive of all the rigs described because the fishing line does not slip through the weight and the fish will feel drag against the weight.
However, it will handle larger Rainbow Trout. It uses a minimum of components (a hook and a split shot). More weight can be added as conditions require. And, it is quick to setup especially with cold fingers in freezing weather!

Monday, July 7, 2014

15 Tips to Reduce FLIES Around the Chicken Coop

15 Tips to Reduce FLIES Around the Chicken Coop

15 Tips to Reduce FLIES Around the Chicken Coop


When keeping chickens or other animals, flies are an expected nuisance, but there are steps that can be taken to reduce the overall fly population, thereby limiting the risks of disease they carry.
When keeping chickens or other animals,
flies are an expected nuisance, but there are steps that can be taken to
reduce the overall fly population, thereby limiting the risks of disease
they carry. Flies thrive in warm, moist, "fragrant" environments and
different types of flies require different elimination tactics, making a
multi-pronged strategy necessary. So...let's roll one out!
1. Remove the Poop: Promptly remove nightly droppings from the chicken coop. A droppings board is the best solution to this stinky fly attractant and it takes less than a minute daily to scrape it down & add the manure to the compost pile.
1. Remove the Poop: Promptly remove nightly droppings from the chicken coop. A droppings board
is the best solution to this stinky fly attractant and it takes less
than a minute daily to scrape it down & add the manure to the
compost pile.
Promptly remove nightly droppings from the chicken coop. A droppings board is the best solution to this stinky fly attractant and it takes less than a minute daily to scrape it down & add the manure to the compost pile.
2. Sand for the Driest Coop Possible: Use sand as chicken coop litter and run ground cover. Sand coats droppings and dries them out, reducing odors and moisture simultaneously.

Use sand as chicken coop litter and run ground cover. Sand coats droppings and dries them out, reducing odors and moisture simultaneously.
3. Plant Warfare
  • Plant herbs around your coop and yard. Basil, lavender, mint and rosemary are all natural fly repellents.
  • Grow some carniverous plants that eat flies. 
Spice it Up: Herb it up is closer to the point: add herbs to your chicken coop- fresh or dried. I make Spruce the Coop Herbal Fusion comprised of many insect-repellent herbs and sprinkle it in the nest boxes and coop.
4. Spice it Up: Herb it up is closer to the point: add herbs to your chicken coop- fresh or dried. I make Spruce the Coop Herbal Fusion comprised of many insect-repellent herbs and sprinkle it in the nest boxes and coop.

Spice it Up: Herb it up is closer to the point: add herbs to your chicken coop- fresh or dried. I make Spruce the Coop Herbal Fusion comprised of many insect-repellent herbs and sprinkle it in the nest boxes and coop.
I put fresh stalks of rosemary inside my chicken coop during the growing season.
5. Clean Up After Snack Time: When giving chickens sweet treats, especially when trying to help them beat the summer heat, don't leave sticky, sweet remnants behind that will attract flies. Clean up the rinds & compost them.
When giving chickens sweet treats, especially when trying to help them beat the summer heat, don't leave sticky, sweet remnants behind that will attract flies. Clean up the rinds & compost them.
6. Keep it Dry: Eliminate stagnant, warm, pooling water, which serves as breeding grounds for flies. Install drainage where necessary.
Eliminate stagnant, warm, pooling water, which serves as breeding grounds for flies. Install drainage where necessary.
7. Employ Insects:  Fly Predators are
tiny, non-stinging wasps that eat fly larva so they have no chance of
hatching & becoming adult pests. The challenge with Fly Predators is
that chickens love eating them, so they must be strategically placed. 


8. Compost manure vertically
instead of horizontally in a wide pile. This increases the compost
temperature, expedites decomposition and minimizes the amount of surface
area exposed and fly-attracting odors.
Compost manure vertically instead of horizontally in a wide pile. This increases the compost temperature, expedites decomposition and minimizes the amount of surface area exposed and fly-attracting odors.
9. Dial up Compost Temperature:
Cover compost with black plastic sheeting to increase the temperature
inside the pile. Flies like it warm, not hot. Turning the pile also
keeps the pile cooking because the process requires oxygen.

10. Keep It Moving: Install fans to promote airflow inside the coop. It's tough to fly with a lot of air turbulence.
Install fans to promote airflow inside the coop. It's tough to fly with a lot of air turbulence.
11. Move Compost Pile: Locate compost pile as far away from the chicken coop and yard as practical. 

12. Eliminate Dirty, Wet Hay: Either compost soiled hay or spread it out on the ground on a sunny day to dry it out (moisture+ smell=fly attractant).


13.  Vanilla scented air fresheners. Some chicken-keepers swear by them. Read more about using them them here.


14. Fly traps. Each type of
physical fly trap has its drawbacks: some are stinky, nasty to look at
and some are costly, but most are effective to varying degrees.


  • The type of inexpensive, disposable trap shown below should be hung no higher than four feet from the ground. They're stinky, but they work. 
Each type of physical fly trap has its drawbacks: some are stinky, nasty to look at and some are costly, but most are effective to varying degrees.
  • The Epps Biting Fly Trap attracts
    flies that bonk into the unit, fall into soapy water and drown. My
    neighbor has been using hers for years and can't say enough good things
    about it. A visit to her chickens and horses is remarkably fly-free. You
    can see my neighbor's Epps unit in this photo behind Scooby, the white
    horse enjoying a dust bath. 
The Epps Biting Fly Trap attracts flies that bonk into the unit, fall into soapy water and drown. My neighbor has been using hers for years and can't say enough good things about it.
15. Biological Warfare: Use an all-natural, organic, live enzyme purifying/cleaning solution such as Farm 360
to expedite the decomposition of organic waste. By breaking down
organic waste, odor-causing compounds are eliminated, ammonia is
neutralized and the coop and yard are healthier for chickens to live in
without those pesky flies around. 


Use an all-natural, organic, live enzyme purifying/cleaning solution such as Farm 360 to expedite the decomposition of organic waste. By breaking down organic waste, odor-causing compounds are eliminated, ammonia is neutralized and the coop and yard are healthier for chickens to live in without those pesky flies around.

Friday, June 27, 2014

Baiting Trout

Offering tasty baits, whether manmade or natural, is the way to lure hungry trout released from the hatchery.

Fly-fishing and trout go together like hotdogs and baseball, yet during the early season, conditions may not be favorable for any form of artificial offering. Granted, it’s a lot of fun watching a wily trout rise beneath a dry fly, and the anticipation of awaiting the strike is almost beyond description. Conversely, it is equally frustrating to watch a trophy trout cruise within range of a perfectly presented nymph then completely ignore your offering.
There’s one thing, however, that’s rarely ignored: bait. Most trout, especially those fresh from the hatchery, rarely forego the opportunity to dine on an easy meal.
SALMON EGGS
Salmon eggs are a highly productive trout bait, especially on opening day. They’re the right size and shape, and in many instances, they are saturated with flavored oils for added enticement. Cheese-flavored eggs seem to be the most popular.
Salmon eggs come in a variety of colors. While red and yellow seem to top the list with fishermen, many anglers have switched to the new fluorescent colors, claiming that they’re more productive during the season’s first few days. And, for some unexplained reason, trout tend to be more attracted to various shades of red over many of the brighter colors.
The popularity of salmon eggs has always been quite high among early-season trout anglers, so high that hook manufacturers went to the trouble to design hooks specifically for use with salmon eggs. They are available in various sizes ranging from No. 8 to No. 14. These hooks have extremely short shanks and come in both turned-up and turned-down eye styles. When properly rigged, the hook can easily be concealed entirely within a single salmon egg. Consequently, the only thing the rainbow, brookie or brown actually sees, even in clear water, is the egg itself.


CHEESE
What do you do when your local tackle shop is sold out of salmon eggs? Make a quick stop at the corner convenience store. Most are open 24 hours a day, and they all sell cheese.
Most soft cheese products make great trout baits, particularly when you’re targeting trout that are fresh from the hatchery. Cheese oils rapidly disperse with the currents, often luring hungry trout from incredible distances. Additionally, soft cheese can readily be formed around a salmon egg hook and molded into pellet-shaped morsels. When all other forms of bait fail, a small glob of cheese may save the day.
MARSHMALLOWS
The first person to use marshmallows for bait was either very creative or totally frustrated. Whatever the case may have been, it worked. Yes, those tiny cocktail marshmallows have saved the day for many trout anglers, especially during the season’s first few days. While marshmallows don’t resemble any form of trout food, hatchery or natural, they do emit sufficient odor to attract various species of fish. In fact, some anglers complain that they are too effective.
Marshmallows can be cut or torn into smaller pieces, then easily formed to cover a salmon egg hook. However, because they have a relatively high air content, marshmallows have the tendency to float. Therefore, a small piece of split shot, preferably BB size must be added to the line about 12 to 18 inches above the hook. This will place the bait close to the bottom. Be sure not to add more weight than necessary to hold bottom, while still allowing the bait to drift naturally. Add too much weight and you’ll spend most of your time trying to dislodge the split shot from snags.
CORN
While fresh corn, yellow or white, doesn’t seem to work well at all, canned, whole-kernel, yellow corn makes a great trout bait. Some believe this is because fine-ground grains are one of the main components in fish pellets, one of which may be corn. The list of ingredients on the side of the fish pellet can does not specify which types of grains are used, but corn seems to top the list of most commercially prepared fish and animal foods. If this is indeed the case, there’s a good argument for the use of corn for trout bait, particularly during the early days of the season.
Again, the bait should completely cover the hook. Depending on the hook’s size, this may require two or possibly three kernels. Fortunately, corn has a slight negative buoyancy, therefore, only one or two split shot may be required to maintain the proper depth. If the stream or river currents are somewhat fast, more weight may be required to maintain the correct depth.
NATURAL BAITS
Worms
While some designated trout streams mandate the use of artificial lures or flies only, many stocked streams permit the use of various forms of natural bait. Obviously, before fishing any body of water, it is a good idea to carefully scrutinize the regulations pertaining to that location. If it is permissible to use live bait, then the selection is almost endless. After feeding on fish pellets for nearly a year, newly stocked trout have two options: switch to natural foods or starve to death. A week or two after stocking, most trout will eat just about anything that comes along, especially if it looks perfectly natural.
Nothing is more appealing to a hungry trout than a fat, pink, juicy garden worm floating with the currents. Even when the weather has been too cold for the worms to occur naturally, trout will instinctively pounce on a properly presented worm. The key to success is proper presentation. As with all forms of bait, the hook should be well hidden. Additionally, if a piece of split-shot is required in order to reach bottom, use just enough weight to maintain the correct depth, while still allowing the bait to drift naturally with the currents.
The worm should be cast upstream at a 45-degree angle, preferably well above the head of the pool. Just as soon as the bait hits the water, close the reel’s bail and begin a slow, deliberate retrieve. Keep sufficient tension on the line to detect the slightest strike and also to gently lift the bait over the snags.
Minnows
A few weeks into the season, trout will actively feed on minnows. While many states do not permit the use of native minnows, tiny fathead minnows are a good substitute, particularly when they measure no longer than 2 inches. The minnows can be either lip-hooked or impaled just beneath the dorsal fin, thereby keeping them alive and active as they drift through deep pools. Some anglers find that attaching a small, clear plastic float aids them in casting the minnow to the most productive locations, such as close to submerged boulders or close to an undercut segment of shoreline.
Crayfish
Small crayfish, those measuring just 1 to 2 inches in length, are great trout baits, especially as the season progresses and water temperatures begin to rise. They can be hooked through the tail and scooted across the bottom, or hooked carefully through the nose and walked over the bottom. Both techniques seem to be equally effective. Keep in mind, however, that crayfish reside and often hide beneath flat rocks; therefore, unless you keep constant tension on the line, they will quickly scurry under any suitable rock.
Hellgrammites
Hellgrammites, the larvae of dobson flies, are likely among the ugliest creatures that nature could have ever dreamed of. They have a prehensile tail, a soft black body with lots of legs and head that resembles that of a gigantic ant. Unlike a butterfly that becomes a beautiful, winged creature after metamorphosis, the dobson fly just grows wings and remains ugly. You can find them residing on the back side of partly submerged, flat rocks in most free-flowing streams. They’re not pretty, but they’re irresistible to any trout.
Hellgrammites have a hard-shell collar that is located directly behind the nasty-looking head and powerful pincers. The collar is a good place not only to hold them, but additionally, it’s a great place to insert your hook. In this particular instance, the hook will be exposed, therefore, a small No. 10, short-shanked, bronze hook will be your best bet. The hook’s color closely resembles that of the hellgrammite. The only problem trout anglers complain about when using hellgrammites is that everything in the stream seems to enjoy eating them.
As the season progresses, other forms of natural baits will become highly productive. Don’t overlook such crickets, grasshoppers, moths and various forms of insect larvae. As each of these becomes available naturally, they also become an integral part of a trout’s diet.

Tuesday, June 24, 2014

Homemade Remedy For Dehydration

Homemade Remedy For Dehydration


Homemade Remedy For Dehydration
Becoming severely dehydrated can rapidly become life threatening.
The most common cause of dehydration is diarrhea, which can be a result of food poisoning, drinking contaminated water, or other sickness or contamination.
Those who have experienced any of these ailments know full well the severity at which your body can be ‘put down’ by an invisible agent.
Especially when in an environment of post-disaster or unsanitary living conditions, you are at risk of being inflicted with diarrhea which can rapidly lead to dehydration.
The key to recovery is to remain hydrated. A homemade re-hydration solution from the following recipe could become a lifesaver for someone who is ill and dehydrated.


Because plain water does not contain sugar, sodium, or potassium (which also is lost from diarrhea) it is important to drink plenty of fluids that contain these substances.
Examples of such drinks include ‘sports drinks’, prepared re-hydration solutions, chicken or beef broth, soft drinks, or bottled and flavored mineral water.
Antibiotics will sometimes resolve the symptoms of diarrhea – however, antibiotics won’t help with viral diarrhea, which is the most common type of infectious diarrhea.
Drugs that slow diarrhea are controversial. Some doctors don’t like their patients to take these medications because it slows the passage of the virus, bacteria, or parasite out of the body. If you wonder whether you should use any of the over-the-counter preparations available for diarrhea, ask your doctor.

A simple alternative to a store-bought re-hydration solution is the following recipe from the World Health Organization:

Homemade Remedy Solution For Dehydration From Diarrhea

Clean water (4.5 cups or 1L)
Salt (1/2 teaspoon or 2.5mL)
Sugar (6 teaspoons or 30mL)
OR…
Clean water (1 cup)
Salt (1/8 teaspoon)
Sugar (1.5 teaspoons)
Oral rehydration solutions should be consumed or discarded within 12 hours if held at room temperature.

Sources include the World Health Organization, WebMD

Five Benefits of Paracord

Five Benefits of Paracord

June 23, 2014, by Ken Jorgustin

benefits of paracord
Paracord is a highly versatile multi-filament nylon cord with nearly unlimited uses, applications and benefits, and is a must have for any survival and emergency preparedness kit.
More details about this amazing cord…


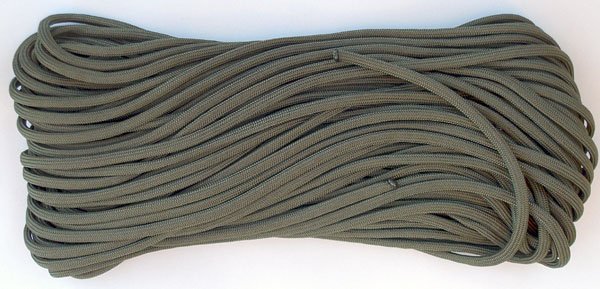
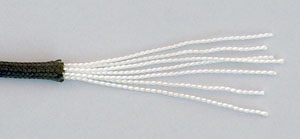
Real paracord is made of seven strong nylon cords with each cord made of several smaller woven strands, all wrapped in a flexible outer braided nylon wrapper. The combined breaking strength of real paracord is 550 pounds. For this reason, some call it “550 cord”.
The cord was first introduced and applied in parachute construction during WWII and was quickly recognized for its use in other tasks. Today it is used by both military and civilians for countless general purpose tasks.
There are many copies in the civilian market today but true military grade cord will be designated MIL-C-5040 Type III and rated for 550 pounds.
Genuine MIL-SPEC MIL-C-5040 Type III Paracord has 7 inner yarns, each made up of 3 strands.
Commercial/Civilian 550 paracord imitations might not have 7 inner yarns or the inner yarns might not have 3 strands each.
“According to the actual Mil-C-5040 government document 550 type III Paracord should be made up of between 7 and 9 strands and each strand shall be 3-ply.”
Having said that, much of the paracord on the civilian market is still VERY good. Just be sure that there are 7 inner yarns (some have 5). It is apparently fairly difficult to find the real Mil-spec paracord with 7-inner yarns AND with each yarn consisting of 3-ply (3-strands) (most are 2-ply, which is still very good for most all purposes).
The cord comes in a variety of colors and lengths (when cut, the ends should be burned or singed to prevent fraying). The inner strands can be easily pulled out for many additional uses.

paracord-7-inner-strands

The 5 Benefits of Paracord

Strength
(In just a 1/8 inch diameter cord, an incredible breaking strength of 550 lbs.)
Durability
(It can be used over and over again while remaining flexible and durable)
Light Weight
(The Mil specification requires that 225 feet of cord weigh 1 pound or less)
Water and Mildew Resistant
(Outside elements are not a problem and it will dry very quickly)
Inner Strands
(The unique ability to remove the inner strands make this cord extremely versatile)

Uses for Paracord

The list is really endless and up to your imagination, but a few ideas include the following.
  • Braiding for even more combined strength
  • Tent and Pole support, building shelters
  • Clothes Line
  • Tow Line
  • Tarp Tie Down
  • Equipment Guy-lines
  • Pack Strap, Fasten, lash and secure gear to backpack
  • Shoe Lace, Boot Lace
  • Garden Lines
  • Shelter Making
  • Fire Bow
  • Lanyard
  • Survival kit
  • Knife Handle Wrap
  • Lifeline, since it will support the weight of a human
  • Inner strands: sewing, fishing, trapping-snares, dental floss, emergency stitches (boil first)

How to Start a Fire After It’s Rained

How to Start a Fire After It’s Rained

It was pretty damp this past Saturday. It rained a few times off and on, and when we finally decided to practice starting a fire in such wet conditions, it was about 85% humidity out. Just in case anyone’s curious about the weather conditions at the time we tried this, the current temperature was 26°C/79°F with little to no wind, so pretty reasonable conditions other than the fact that it had rained multiple times. The fire pit we regularly use wasn’t flooded in any way, but it was certainly drenched wet
fire pit soaking wet
We were determined to start the fire with only the very cheap and simple tools that Thomas EDC’d in his pocket, along with a knife of course. Altogether, we used a waterproof capsule, some lint, firesteel, a bowie, and a pocket knife.
prepping for fire-making
First, of course, Thomas got the lint out of his waterproof capsule.
waterproof-capsule-for-survival
taking out lint for tinderWaterpoof Capsule – Amazon
Once we had the lint, Thomas grabbed one piece out of our large pile of semi-rotted logs, and placed it straight up. He then went to make some dry wood shavings with his knife.
using wet log to build fire
preparing log for fire after rain
In order to determine which branches were dry enough on the inside to use, he flexed a few. The ones that bent he put back since they were too wet. The ones that cracked or snapped, he used for tinder.
dry wood shavings from wet branch
dry wood shavings after rain
carving wood shavingsOntario SP10 Marine Raider Bowie – Amazon
In order to get bigger pieces of dry tinder, he found some thicker branches, and through batoning, managed to cut the tree branches into quarters and then again into even smaller pieces. Once he got to the inside of these branches, he used the dry insides to make large shavings for tinder.
making dry tinder from wet log
batoning log with bowie
bowie used for batoning wood
making a fire after rain
After making enough tinder, he piled it up, placing the lint in the center of the pile, and took out his firesteel to start generating sparks. In order to make sparks with firesteel, you’ll need to use the back of a knife in combination with it. If you’re not sure how, we’ll discuss this in a later post. Although Thomas could have used the bowie again, he decided to use his pocket knife instead, as it’s easier to use a smaller knife to generate sparks.
making a fire when wood is wet
generating sparks with fire starter steel and opinelLight My Fire Swedish Firesteel Mini – Amazon
Opinel No8 Carbon Pocket Knife – Amazon
Once the sparks caught, we realized that the ember had actually been blown into the center of the log and was glowing. Going with it, we began to blow on the center.
ember in core of wet log
After a few minutes of blowing off and on, and adding more tinder to the core, we managed to get a heck of a lot of smoke.
smoke from fire in wet wood
fire making after rain survival
And then finally, a beautiful flame.
made fire in wet wood
surviving with fire after rain
Although it takes a bit of effort, making a fire out of wood that’s been wet due to a recent rainfall is definitely possible. Just remember to be patient and make sure you use only the dry parts of wood for shavings, especially until the fire gets started.